

Organize your Contacts
Dex has a lot of various tools to assist you in organizing your contacts efficiently. Click on each tab to find out more about the different features!
You can view and manage your contacts by grouping them in Dex.
Browsing your groups
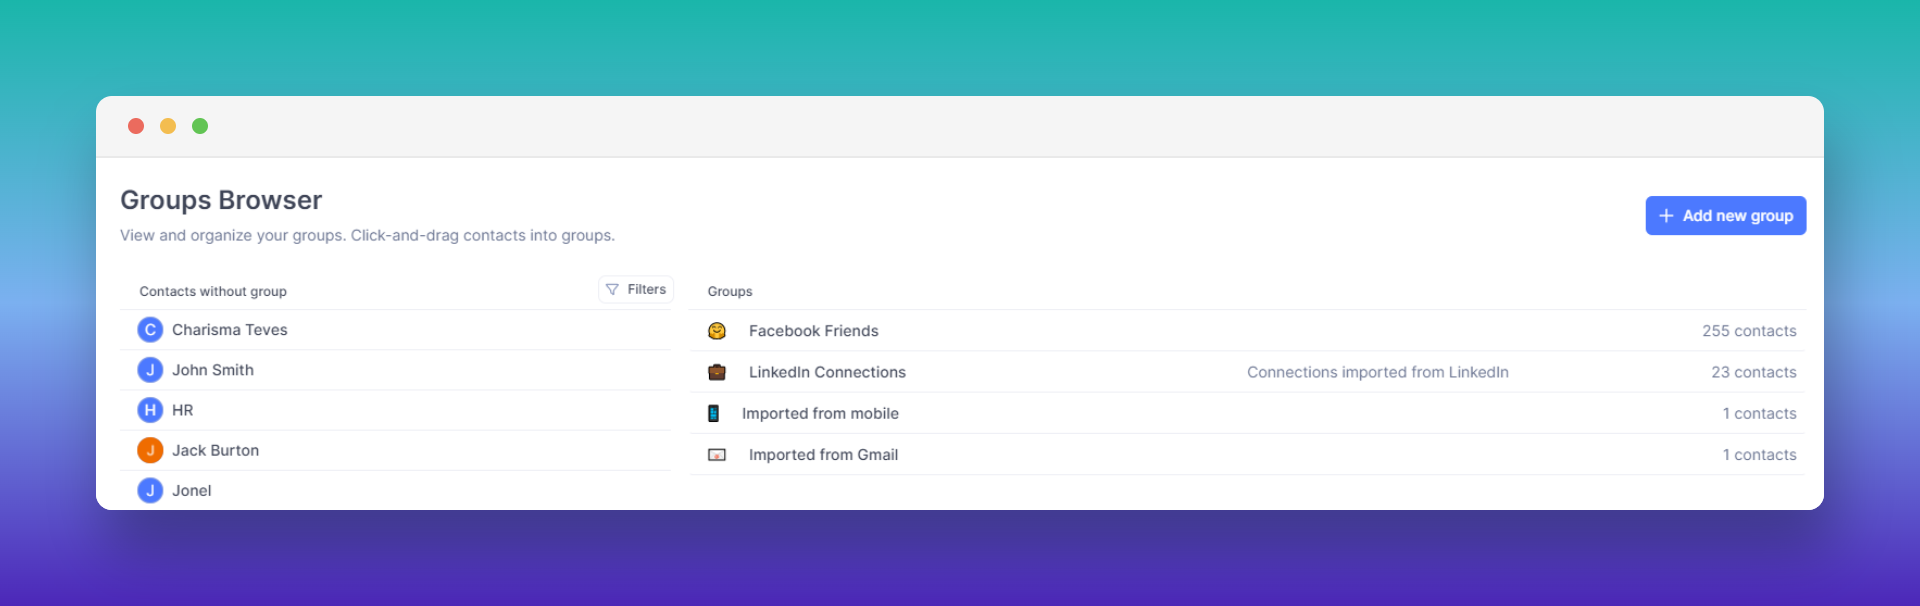
Press G then D to open Browse Groups, a searchable list of every group you have. There is no standalone Groups page in the current app, so this is how you see them all in one place.
From there you can create, edit, or delete a group, or assign existing or new contacts to a group by drag-and-drop.
Subgroups
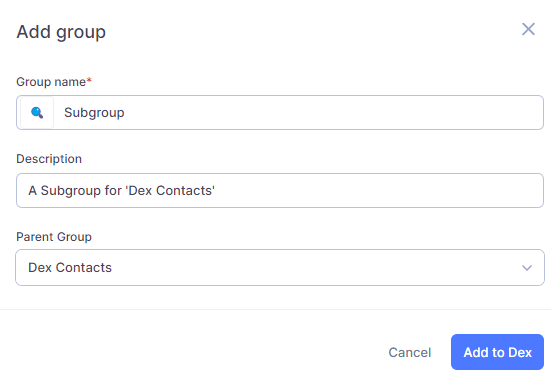
Need to specify the groups more? Create a subgroup for your groups!
Simply click on the '+ Add new group' button and assign it to a Parent Group!
FAQ
You can move contacts in bulk by reassigning them to a new group.
To move all contacts from one group to another:
- Go to Groups.
- Click on the group you want to move contacts from.
- Select all contacts in that group
- Use the checkbox at the top of the list, or
- Use the keyboard shortcut to multi-select.
- Click Add to Group (top-right).
- Select the new group you want to move them to.
- Once all contacts are assigned to the new group, return to the original group and delete it if it's no longer needed.
Dex can now assist with automatically sorting your contacts into groups. Based on the title and other information, it suggests new groups and assigns contacts to the right groups.
Try it out
Click Organize with AI on the Groups page to get started.
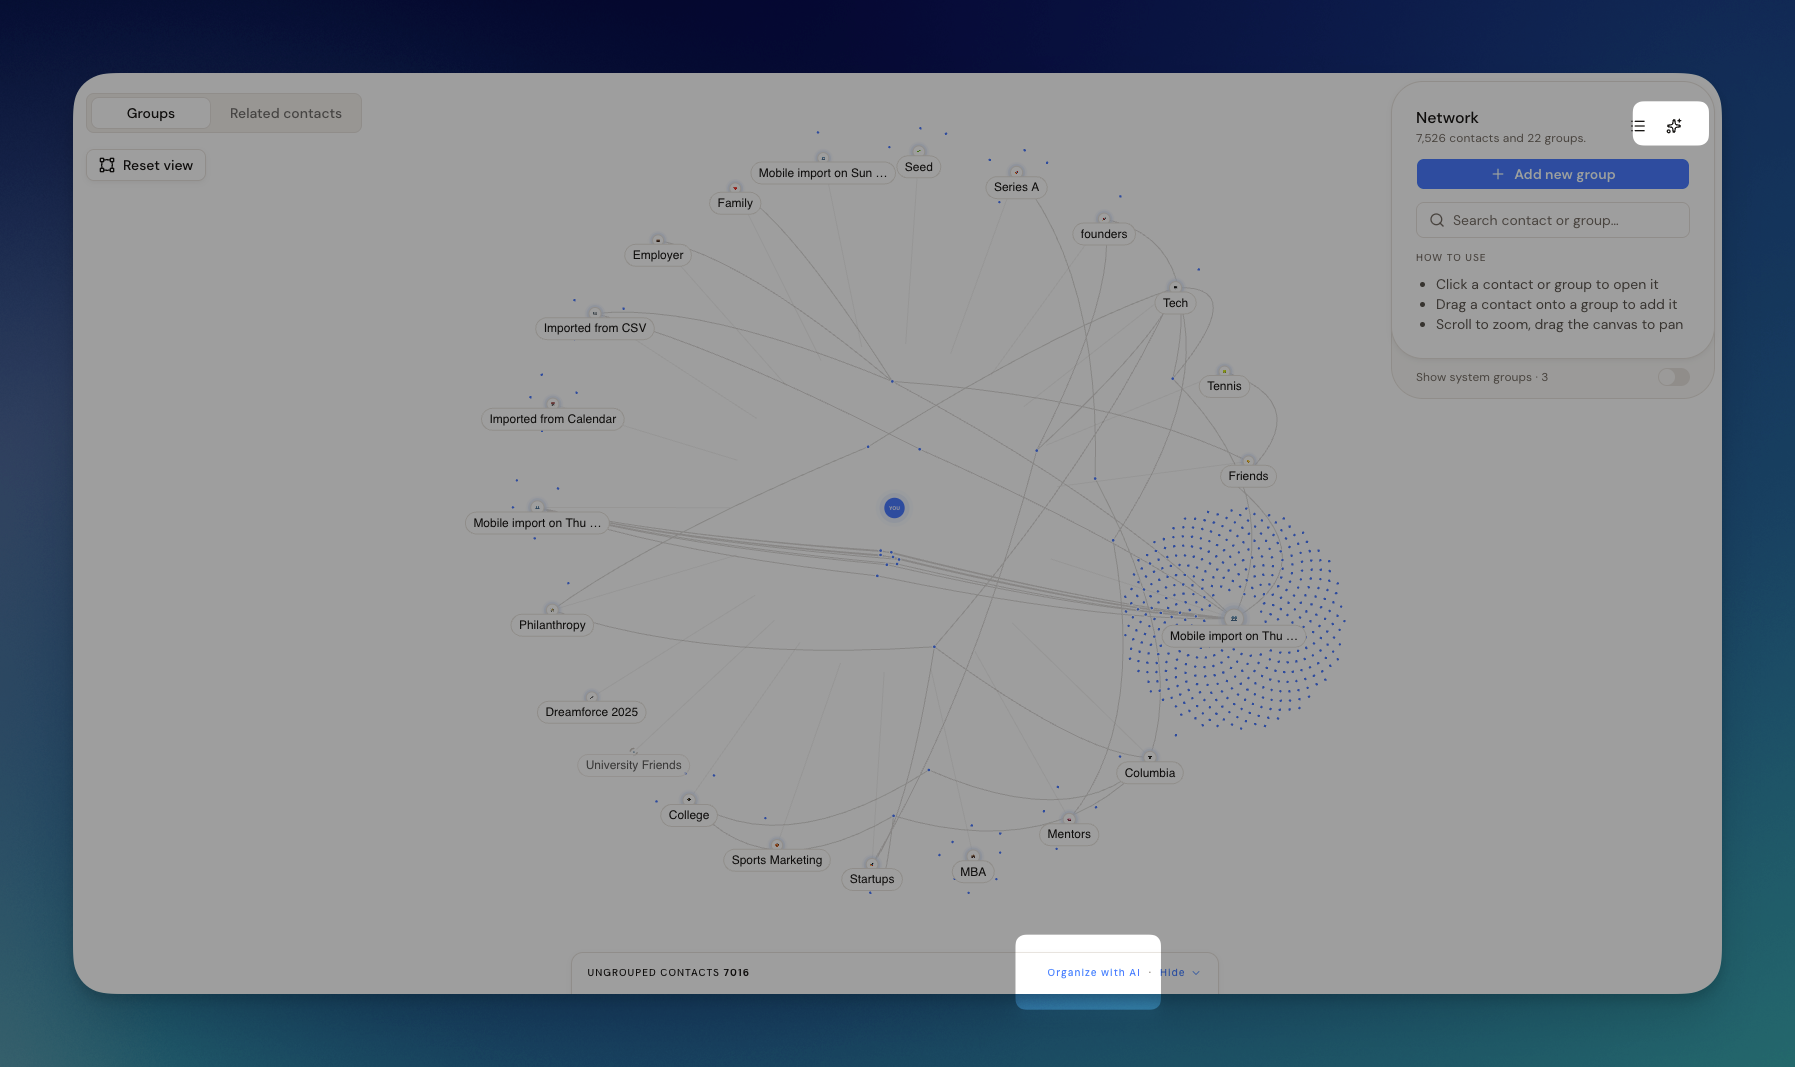
Let Dex handle the sorting so you can focus on the relationships, not the admin work.
If you've ever wondered "Who are all the startup founders in network?" this feature is well worth your attention.
Where your views live
Views are the row of tabs across the top of the Contacts page, starting with All contacts. There is no separate Views page, and no Views section in the left sidebar.
Drag a tab sideways to reorder it. All contacts stays first.
- Default views: we've created views for existing users to show you what views can do -- feel free to delete or customize these!
- Views are saved with contact filters. This means this will update constantly each time you open a View.
Pinning a view to the sidebar
Favorite a view and it shows up under Favorites in the left sidebar, so you can open it from anywhere instead of going back to the Contacts page first.
Hover over the view's tab
A three-dot menu button appears on the tab. It stays hidden until you hover over the tab or reach it with the keyboard, which is why it is easy to miss.
Open that menu and choose 'Favorite view'
The view appears under Favorites in the sidebar. Unfavorite view in the same menu takes it back off.
Rename and Delete for a view live in that same three-dot menu.
Creating Views
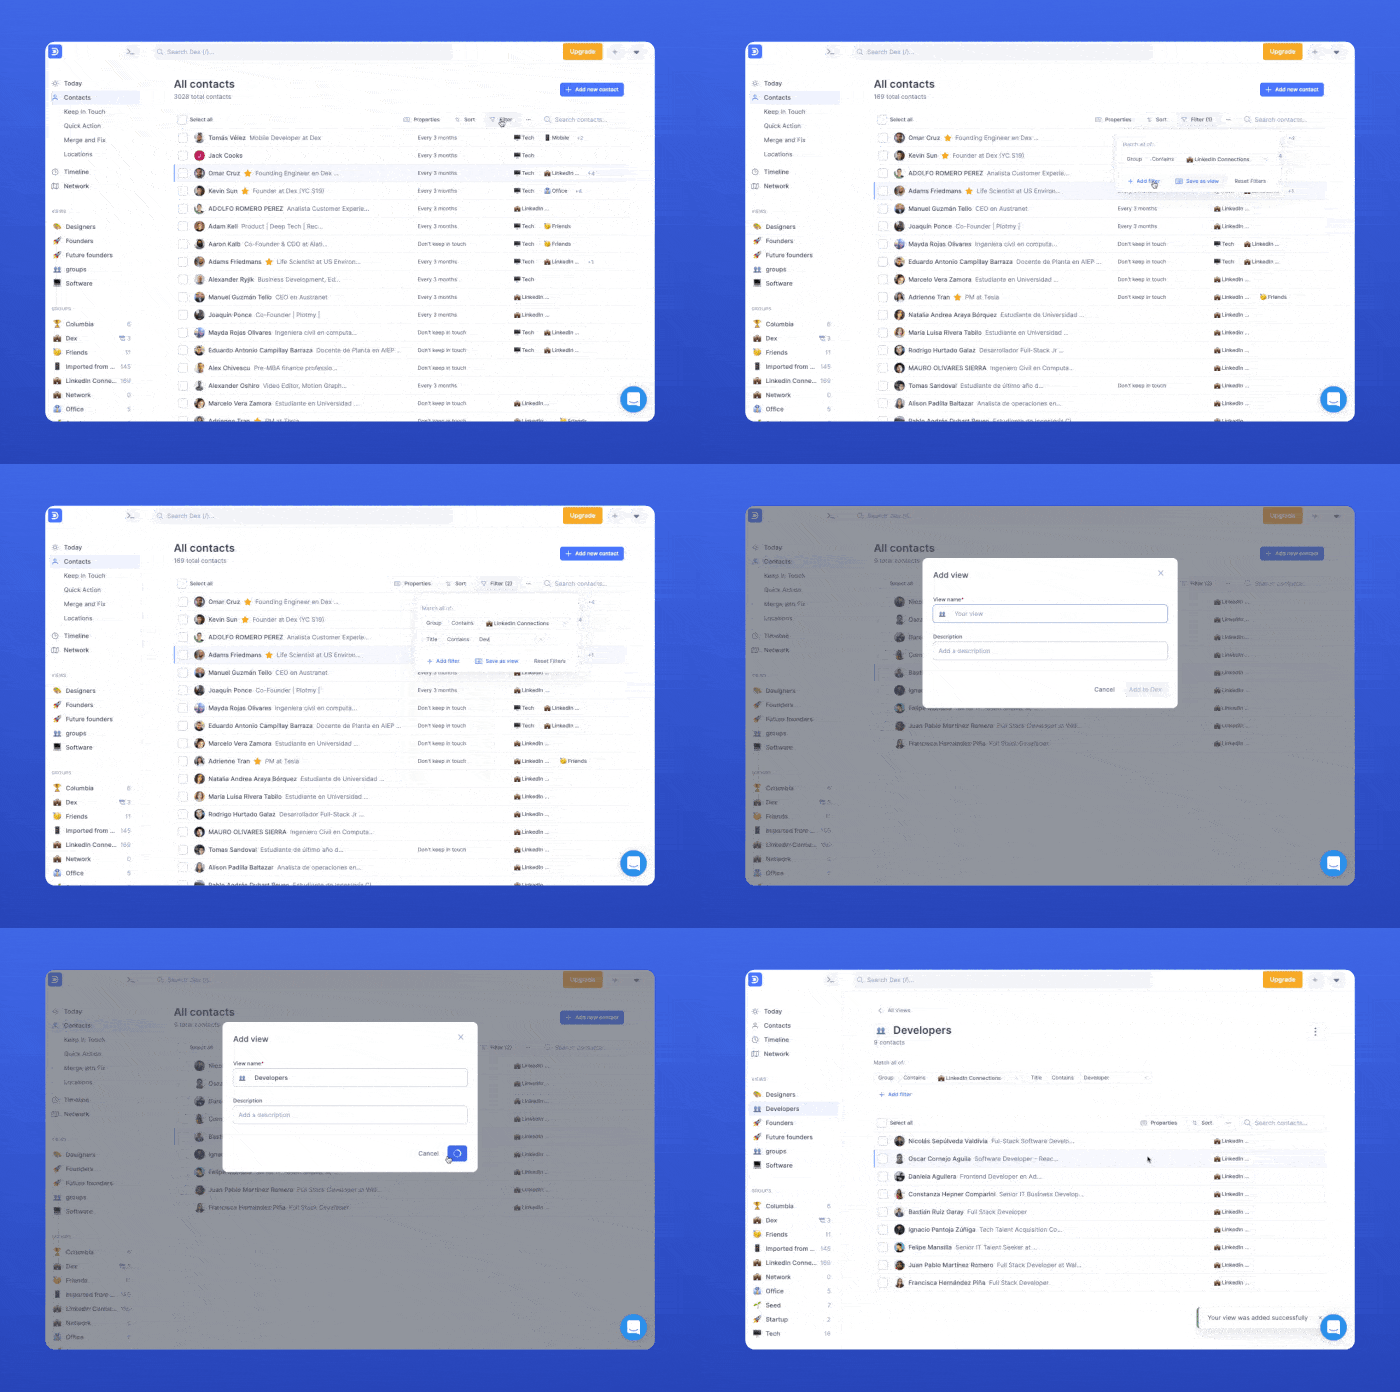
Create a filter
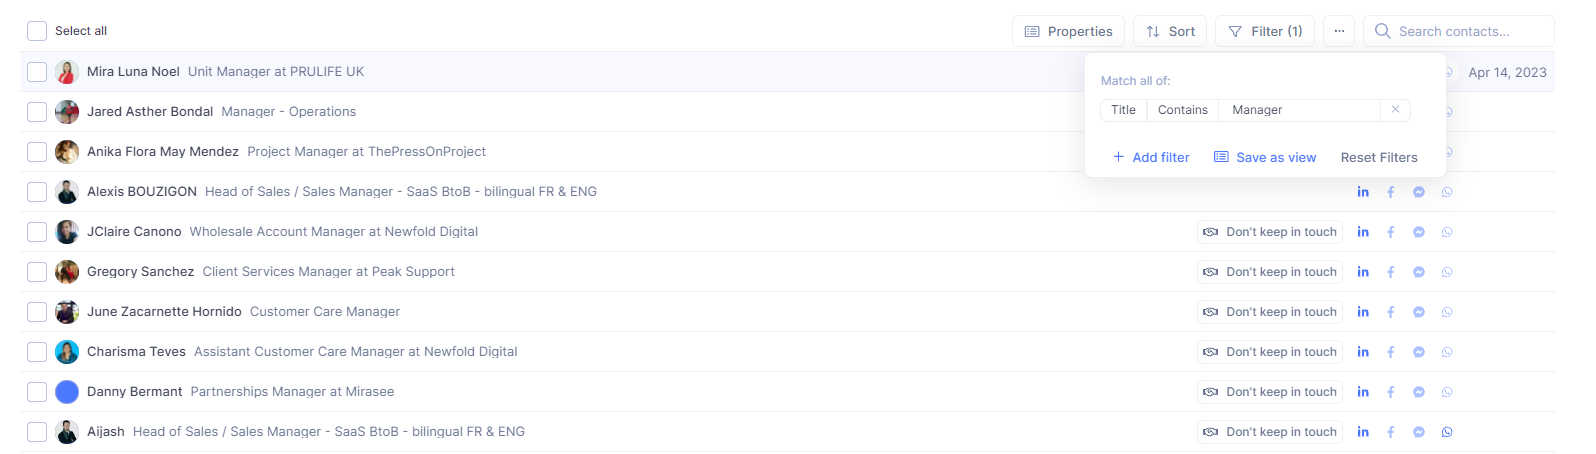
Depending on what you're looking for, you can use the filter options on the Contacts page to start organizing your contacts.
Save your filtered contacts as a View
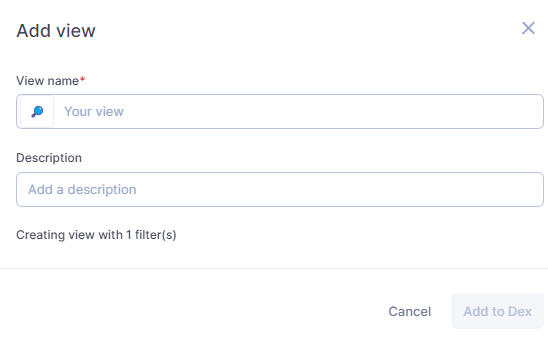
Once you have the list of contacts you desire, click Save as view in the filter bar and give the view a name and description.
Filter Options
- Name
- Title
- Company
- Education
- Description
- Has phone number
- Has email
- Location
- Map Location
- Groups
- Tags
- Keep in touch
- Favorited
- Archived
- Last interaction
- Last LinkedIn message
- Creation date
- Priority (or whatever you have renamed your priority field to)
- Any custom fields you have created
- Companies (LinkedIn) - for LinkedIn Connections
- Education (LinkedIn) - for LinkedIn Connections
Combining filters
You can stack multiple filter conditions to build precise views — for example, a group and a tag and a last-interaction window. Filters also match accented and special characters correctly, so names or companies containing é, ü, or ñ don't need any workarounds when building a view.
How do I find all my contacts that have a phone number, or an email?
On the Contacts page, open the filter bar and pick Has phone number or Has email. Each one is a yes/no condition: set it to yes to narrow the table to the contacts that have one, or to no to find the contacts still missing it. Save the result as a view if it's a list you'll come back to.
This is the list to build before a bulk edit — filter to Has phone number, select everything, and set a Keep-in-Touch cadence for that whole group in one pass. Copilot can do the same thing from a sentence: "set a 6-month keep in touch cadence for all my contacts with a phone number."
View Types
Alongside saved filters, views now come in more than one layout — so you can look at the same set of contacts in whichever shape suits what you're doing.
- Sheet view: the familiar spreadsheet layout, with one row per contact and the columns you choose. Best for comparing many contacts across the same fields, or making bulk edits.
- Board view: contacts shown as cards grouped into columns by a category custom field, which you pick or create when you make the board. Best when you're thinking in terms of stages or buckets, and want to move people between them.
Switching layouts doesn't change your data or your filters. They're two ways of looking at the same contacts.
The Contacts Table has been rebuilt from top to bottom — a cleaner layout, more ways to lay out your network, and faster bulk editing.
What's New
- A cleaner layout and hierarchy make the whole table easier to scan, with clearer typography, better spacing, and the important columns where your eye lands first.
- Board and Sheet views let you organize contacts the way you actually think about them, rather than forcing everything into one long list. See the Views tab for more on view types.
- New view types give you more ways to slice and filter your network.
Choosing your columns
The table is easiest to scan when it only shows the fields you actually reference. Hide the columns you don't use, and sort by last interaction to surface the people who've drifted.
Bulk Editing
Select several contacts to update them together — assign them to a group, apply tags, set a Keep-in-Touch cadence, or archive them in one pass.
This pairs well with a cleanup view: filter to the contacts missing something, select them all, and fix it at once.
Working with a large network
With a large contact list, narrow the table with a filter rather than loading everything at once, and hide the columns you don't need. Both make a noticeable difference.
Want to organize your contacts by interests, industry, etc? Tags may be just what you're looking for.
Getting Started
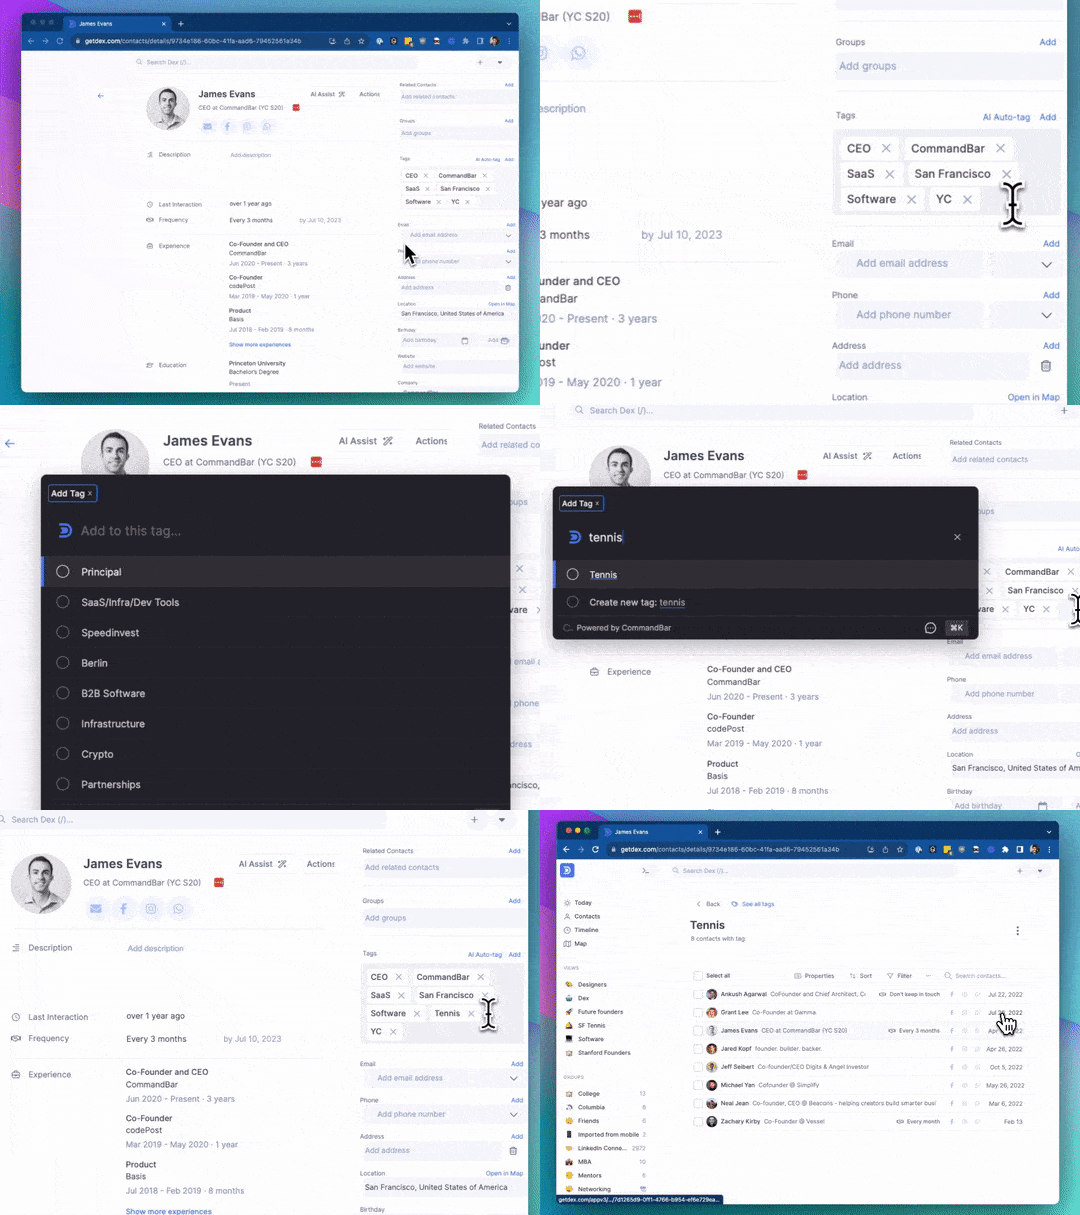
Get started from the contact page by clicking the Tags section or use the 't' shortcut when viewing a contact:
Bulk-tagging
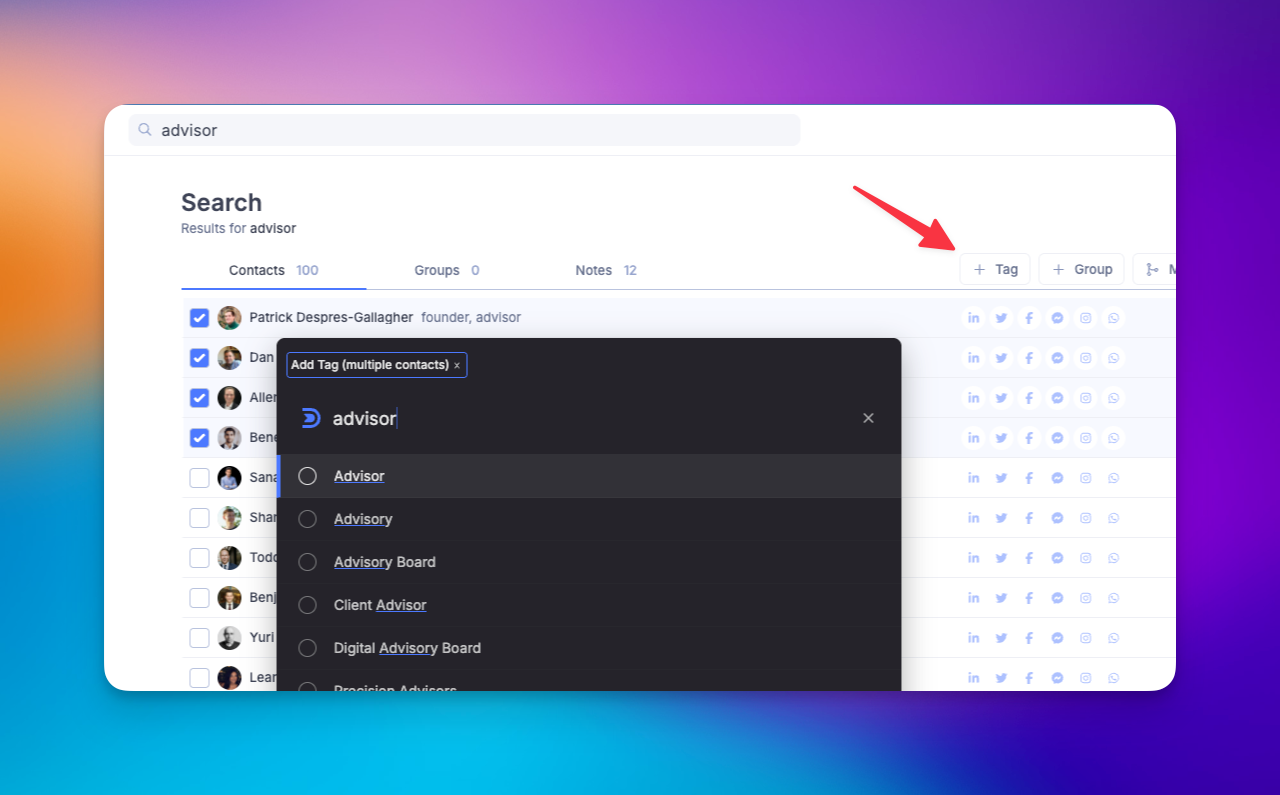
On the Contacts page, you can also tag contacts in bulk.
Simply tick the boxes and choose the option "Tag".
Autotag
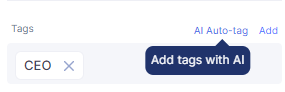
Don't have time to manually create tags for your contacts? Use our AI Auto-tag feature and let Dex do the work for you!
How Autotag works:
- Autotag uses name, title, description, notes, and any LinkedIn data you've added.
- Will generate up to 10 tags per contact, it won't do anything if there is not enough information.
- Can auto-tag 1000 contacts at a time.
You can see this on the Contacts page (Tags all contacts) and on a contact card (Tags the specific contact opened).
Contact Page

Contact Card
Key features
- Filter with Tags: Use one or more tags as a filter condition. Alongside groups and other existing filter conditions, you can create powerful flexible views.
- View all contacts in a tag by clicking a tag.
Importing Tags
Tags can also be brought in through a CSV import — map the relevant column in your file to Tags and Dex will apply them on import. The importer also detects social links automatically and assigns them to the correct fields, with improved compatibility for Google Contacts CSV exports.
Globally manage your Tags
If you need to add, edit, or delete a Tag, you can go to the Tags page:
.png)
Dealing with a lot of duplicates after importing your contacts from different sources? A simple 'Merge and Fix' should do the trick.
Merge and Fix
From the Merge & Fix page, view all the possible duplicates that Dex can find. We currently search duplicates based on:
- Full name
- Phone
- Nicknames are supported (ask us to add more if we're not matching your contacts!).
- Middle names are no longer considered and will not exclude possible duplicates.
- Special characters are handled appropriately!
- For all fields that will be merged (e.g. phone numbers or email addresses), we'll take a combination of all values.
- For all values, we prioritize the most recently created contact.
In addition, we ensure that each set of duplicates does not have different Linkedin, Facebook, and Twitter profiles (or they'd belong to different people). We also ensure that for each duplicate, at least one contact is not an archived contact.
Can Dex scan all my contacts for duplicates, across all fields?
Yes. Merge & Fix scans your whole contact list in one pass — you don't need to name a contact or type an exact value first — and you can ask Dex Copilot to run that same scan for you instead.
"All fields" has one limit worth knowing. The fields compared are full name, every email address, every phone number, and social profiles, plus archived copies of a live contact. Company is not one of them, so two records for the same person that share only an employer won't be flagged.
If you want near-match detection that also weighs company and other fuzzy signals, that's an open request on our feedback board — add your vote there.
A duplicate you know about never appears on the page
Dismissing a suggestion is permanent, and it is wider than the pair you dismissed.
When you dismiss a group, Dex marks every contact in it as one to leave alone, and every later scan skips those contacts entirely. So a contact you dismissed once stops being suggested against anyone, including a different duplicate you create later. There is no list of dismissed contacts and no way to undo it from the page.
If a contact you expect to see is missing from Merge & Fix, that is usually why. Merge it by hand instead: open one of the two contacts, use Actions → Merge, or tick both on the Contacts page and click Merge. Email us at [email protected] if you want the dismissal cleared.
Auto Merge & Fix
What is Auto Merge & Fix?
Auto Merge & Fix is a smart feature that helps keep your contact list clean and organized by automatically detecting and merging potentially duplicate contacts. Instead of manually reviewing and merging duplicates, Dex does the heavy lifting for you!
How it works
Conservative Approach for Accuracy 🛡️
The feature uses a conservative approach to identify potential duplicates, prioritizing accuracy over quantity. This means:
- Fewer false positives - Dex is careful not to merge contacts that aren't actually duplicates
- High confidence matches - Only contacts with strong similarity indicators are considered for merging
- 100% accuracy cannot be guaranteed - While we strive for perfection, the automated nature means occasional errors may occur
An identical name is not enough on its own. The daily pass is stricter than the Merge & Fix page, which is why two contacts with exactly the same name can sit there unmerged and still show up as a suggestion when you open the page. For the daily pass to merge them by name, their email addresses, phone numbers and social profiles have to match as well. It will also merge two contacts that share an identical email address, phone number or social profile, whatever their names say. It never merges across a conflict, so two records carrying different LinkedIn profiles are left alone.
The Merge & Fix page is the looser one. It surfaces a pair on a matching name or a shared email or a shared phone or a shared social profile, any one of which is enough, and it shows archived duplicates of a live contact too. Open the page when the daily pass has left something behind.
The daily pass also skips archived contacts entirely, so archiving a duplicate takes it out of automatic merging without deleting it.
Daily Automatic Processing ⏰
- Dex automatically runs the duplicate detection process every day
- The system processes your contacts in the background without interrupting your workflow
- You'll only see results when potential duplicates are found and merged
How to enable Auto Merge & Fix
Web App
- Go to Settings → Workflow → General
- Find the "Detect and merge duplicates automatically" option
- Toggle the switch to ON ✅

Mobile App
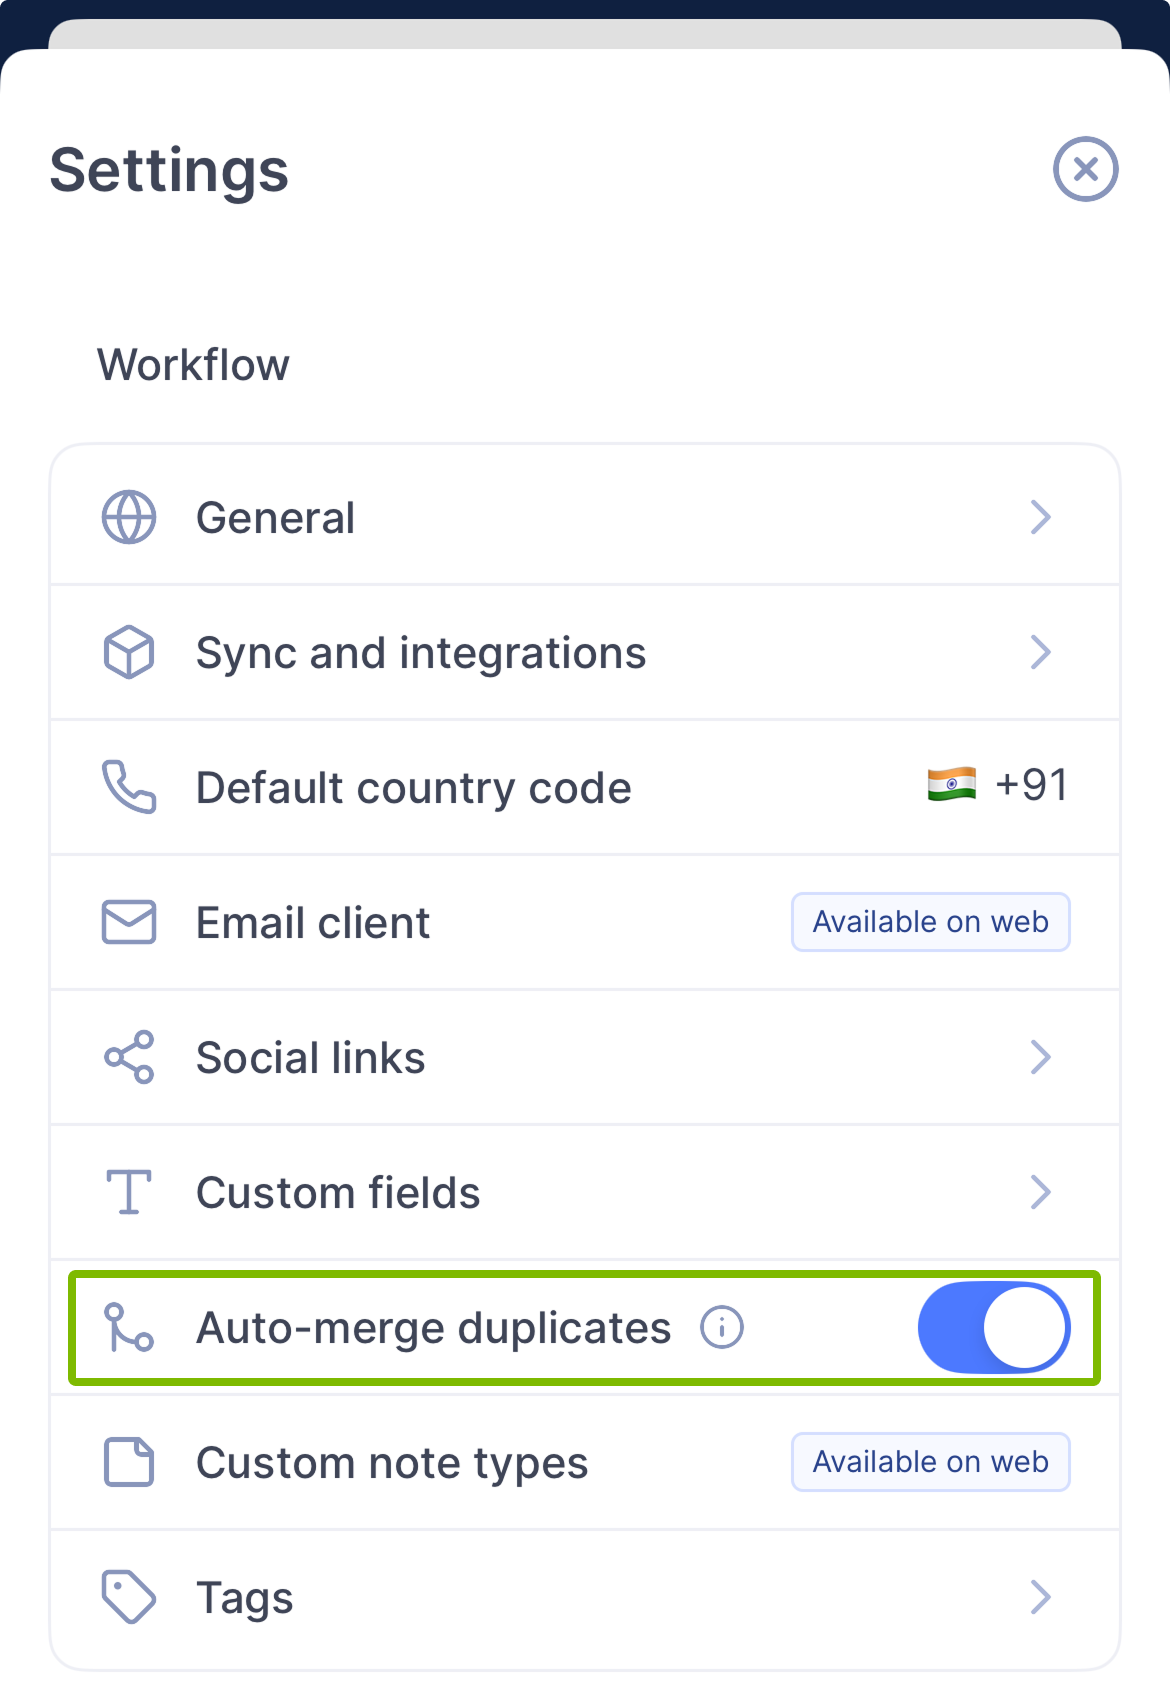
- Open the Settings menu
- Navigate to Workflow Settings
- Enable "Auto-merge duplicates"
What happens when duplicates are found?
When Auto Merge & Fix identifies potential duplicates:
- Automatic merging - Contacts are merged automatically without requiring your input
- Data preservation - All important information from both contacts is preserved in the merged result
- Clean results - You're left with a single, comprehensive contact record
Manual duplicate management
If you prefer to review duplicates manually:
- Disable the "Detect and merge duplicates automatically" setting
- Use the Merge & Fix page to manually review and merge duplicates
- This gives you full control over which contacts are merged
Need help or have feedback?
If you encounter any issues or have suggestions for improving the feature:
- False positives - Contact us if contacts were incorrectly merged
- Feature feedback - Share your thoughts on how the feature could be better
- General questions - We're here to help!
📧 Email us at: [email protected]
Manual Merge from a Contact Card
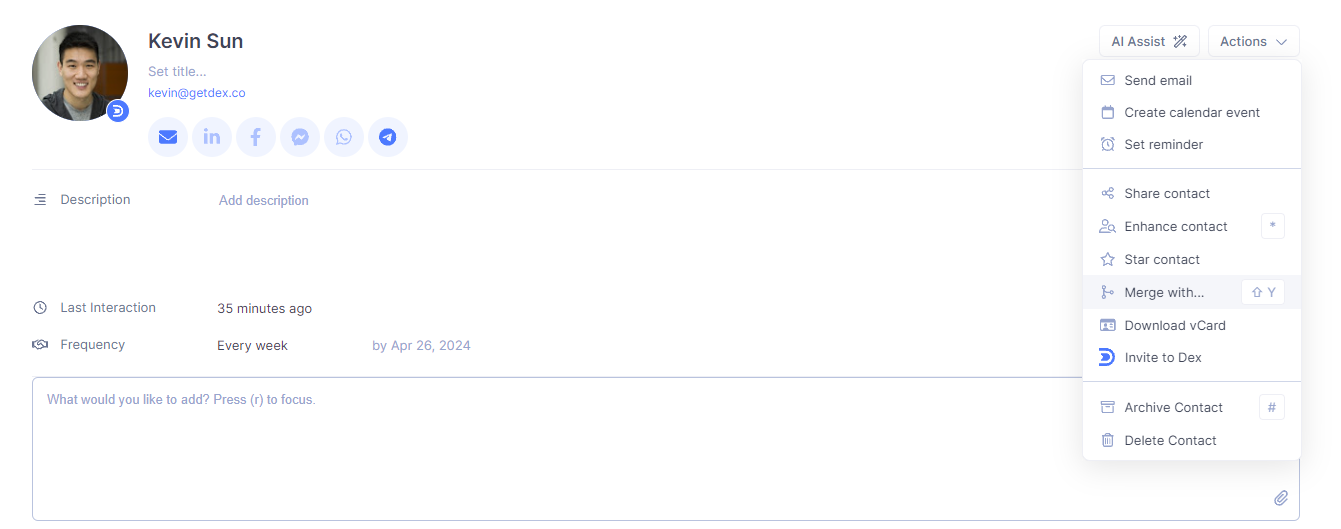
If you want to merge contacts while opening a profile, you can see this option under the 'Actions' menu or through the shortcut key ⬆️ + Y
Manual Merge on the Contacts page
You can merge more than 1 duplicates at a time while on the Contacts page.
Tick the boxes for all the contacts you want to merge and click 'Merge'.

Manual Mobile Merge and Fix
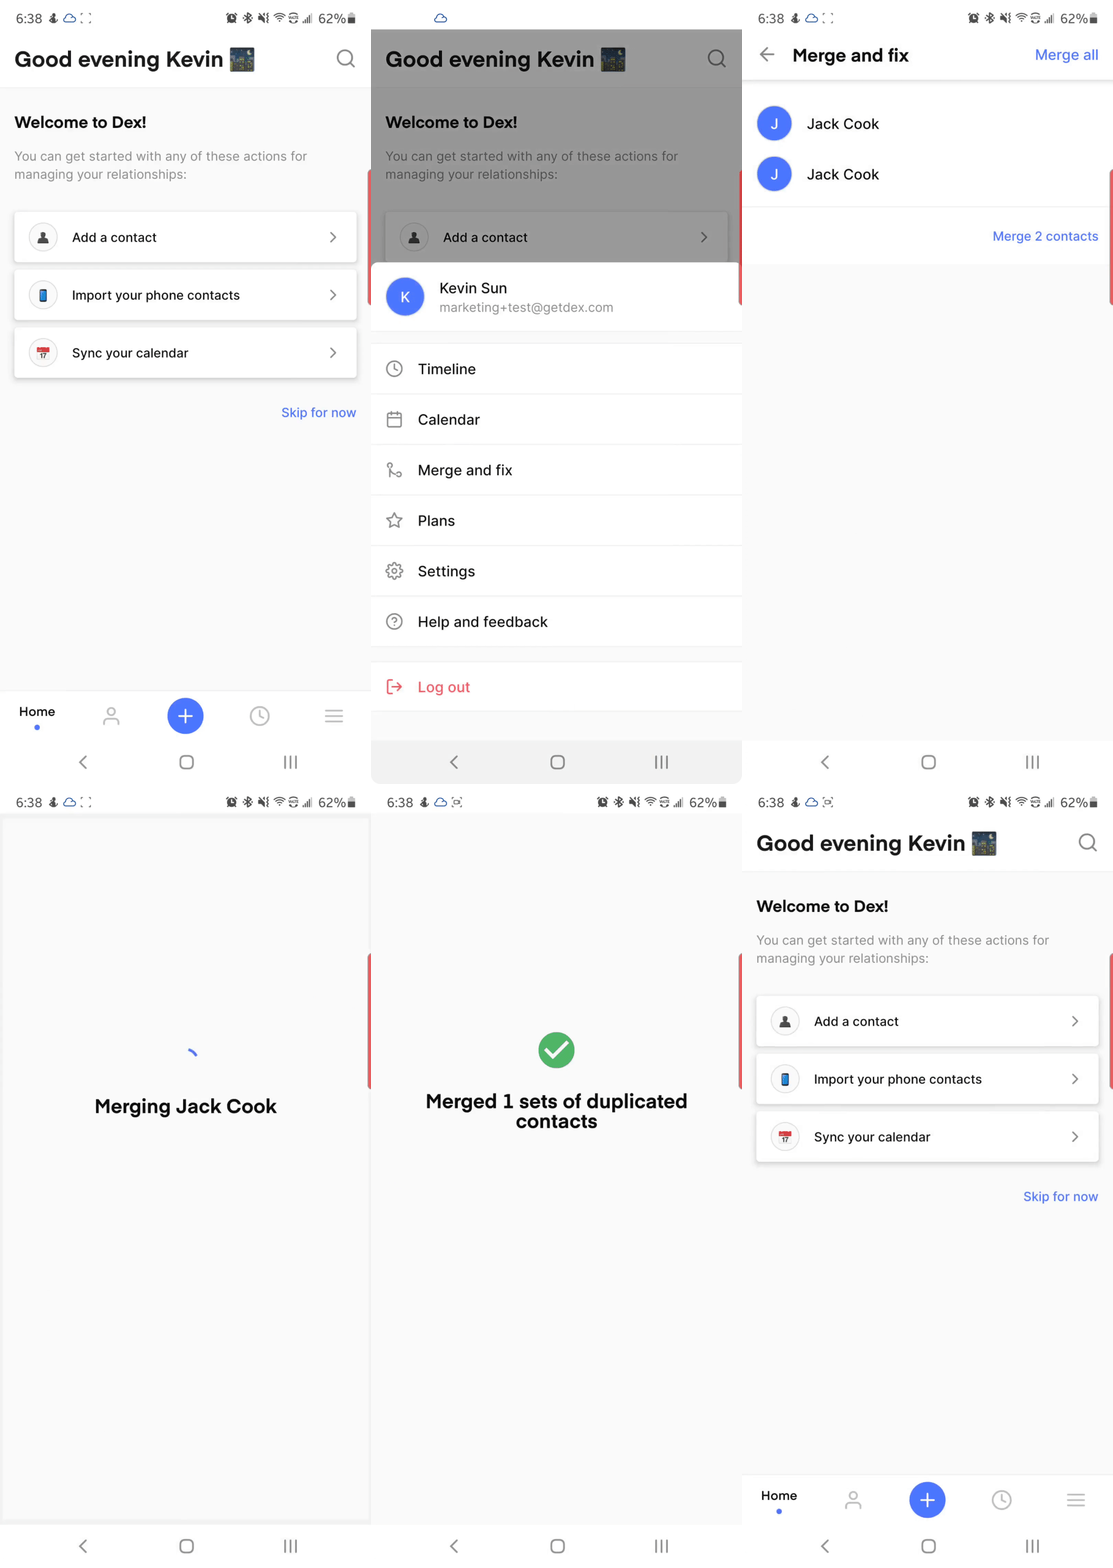
Now available on Dex Mobile, merge and fix operates similarly. Simply navigate to the Merge and Fix section on the bottom right, and merge matching found duplicates:
Merging with an AI assistant
You can ask Dex Copilot in the app to find your duplicates. It runs the same detection the Merge & Fix page uses, shows you the groups it found, and merges only the ones you confirm. Asking it to find or scan for duplicates is enough on its own — you don't have to ask for a merge to see what it finds.
The same works outside Dex through the Dex MCP server, where an assistant like Claude or ChatGPT can review and clean up duplicates for you. Because merging is irreversible, both always ask for confirmation before they proceed.
Archived contacts help you organize your contacts by allowing you to exclude them from sync while retaining the ability to restore them anytime.
How to Archive contacts
You have the option to archive in several ways:
- Select all or multiple contacts on the Contacts page.
- Select all or multiple contacts in a Group.

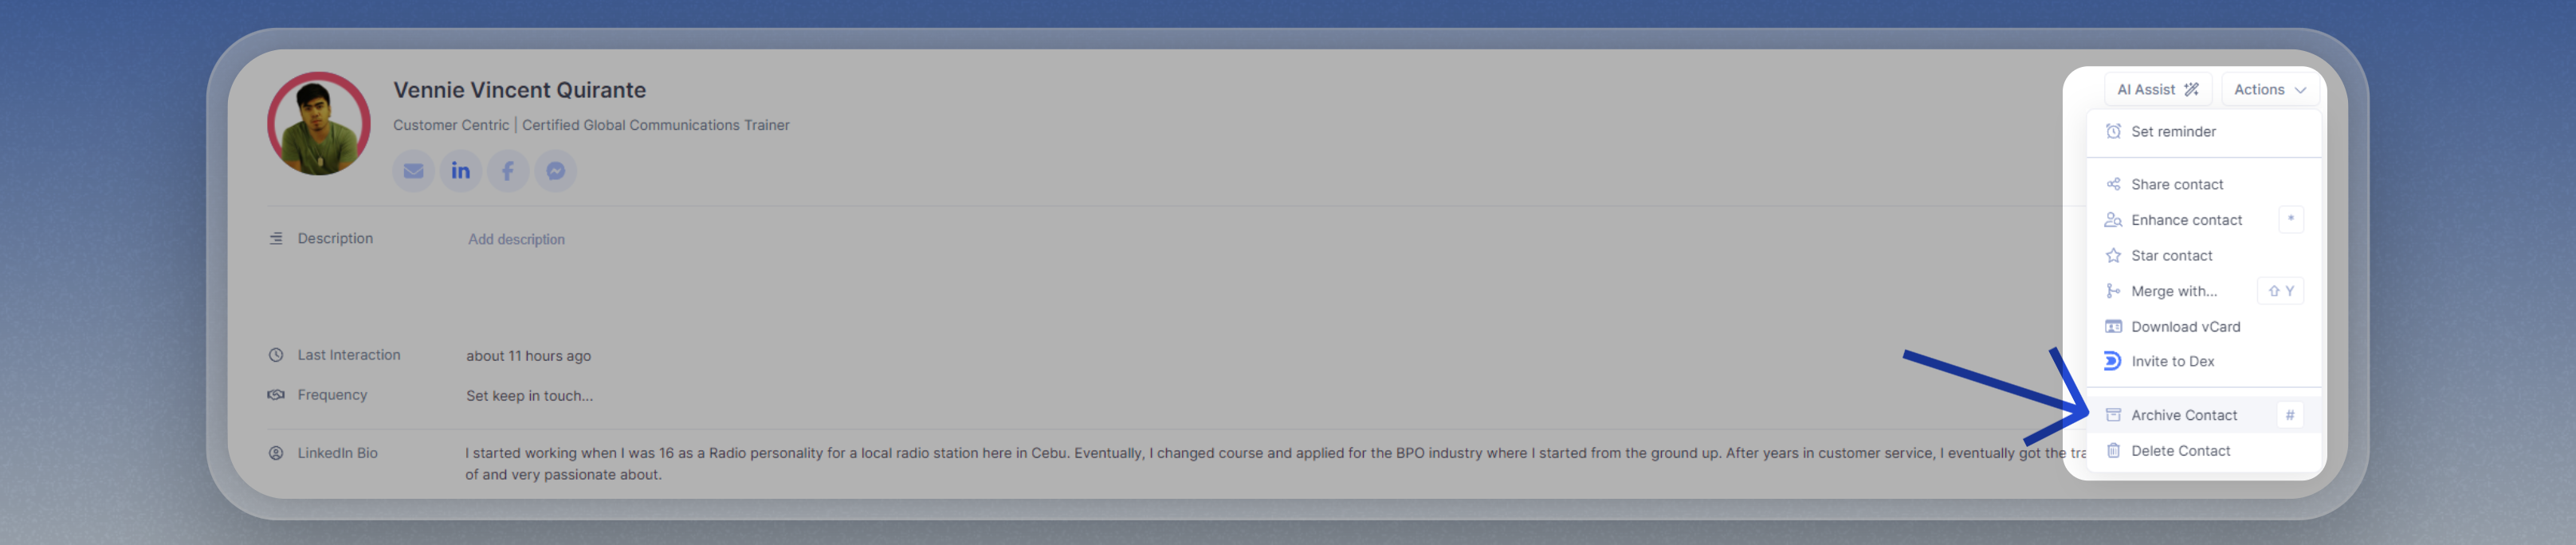
- Archive while on a contact card by shortcut key '#' or through the 'Actions' menu.
Where can I find my archived contacts?
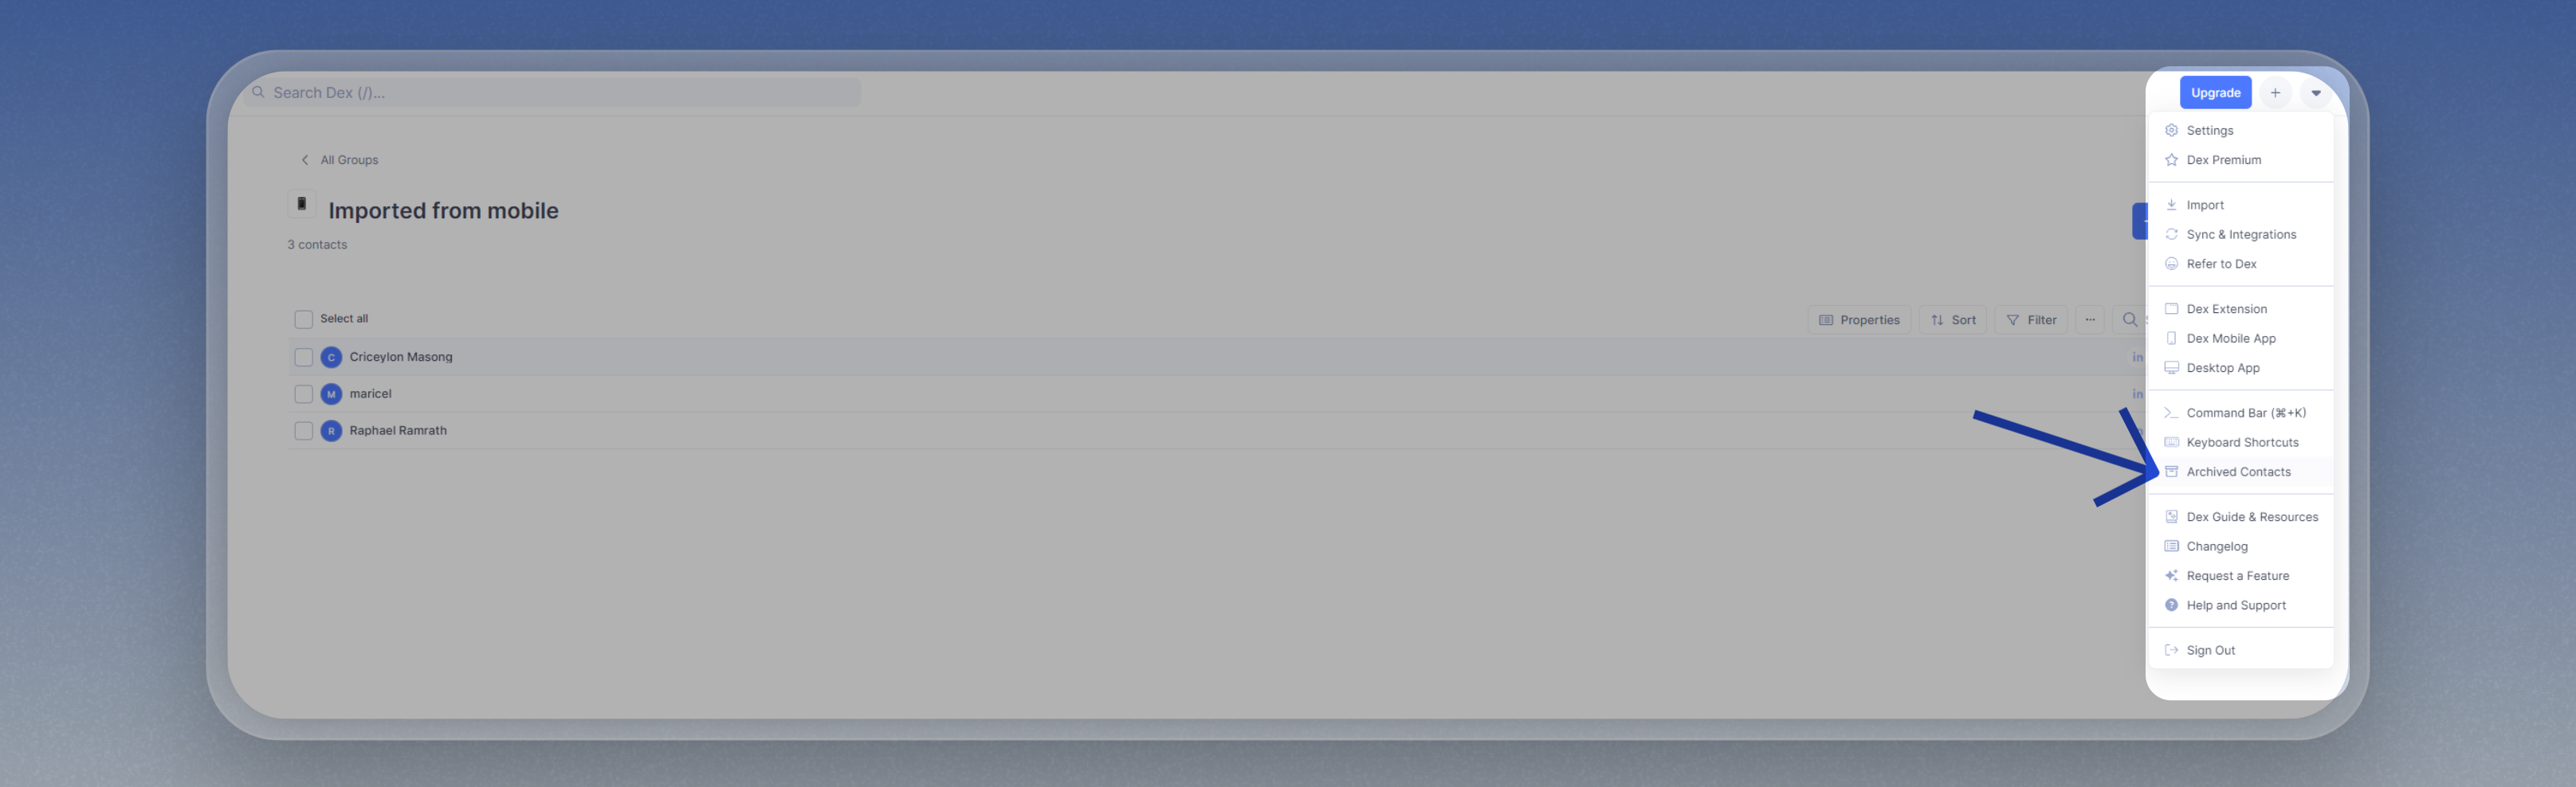
You can find your archived contacts on the Archive page. To navigate to the page, click on the drop-down menu at the top-right corner and select 'Archived Contacts'
This is where you can restore your contacts by simply clicking on the 'Restore' button after selecting the contacts.
Important Notes
- Archived Contacts are excluded from the LinkedIn Sync. This is a good way to prevent contacts from being re-imported by a sync.
- You can still export your archived contacts.
- Archived contacts stay archived indefinitely and are never removed automatically. They are only deleted if you delete them yourself from the Archived Contacts page — see the Permanent Deletion tab.
How do I delete all my contacts and start over?
Use Reset data under Settings → Account → Profile. It deletes every contact (archived contacts included), note, reminder, group, saved view, tag, and custom field in one go. Your account, settings, connected calendars, and calendar events are not affected. Dex shows you the counts first, asks you to type RESET MY DEX DATA, and confirms your password or sign-in provider before anything is deleted.
By default the reset also pauses contact imports from connected accounts such as LinkedIn or WhatsApp, otherwise the next sync would bring the contacts straight back. Turn a sync on again from Sync & Integrations when you are ready. Export your data first if you want a backup.
To clear out only part of your list, select the contacts on the Contacts page and choose Archive, then delete them from the Archive page if you want them gone for good.
RESET MY DEX DATA before anything is deleted. Copilot can also archive or delete specific contacts you name.Dex gives you full control over your contact list, including the ability to permanently delete contacts you no longer need. Here's what's supported and what to keep in mind before you delete.
How to permanently delete a contact
To permanently delete a single contact:
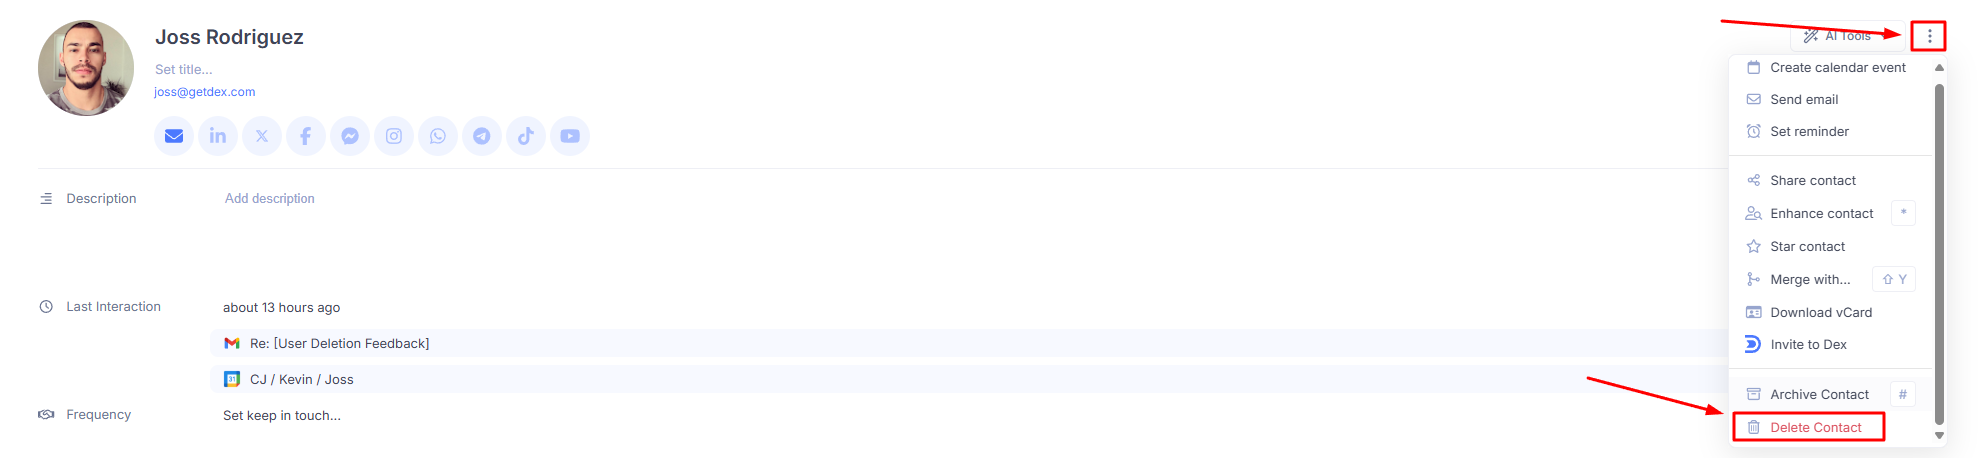
- Open the contact card.
- Click the Actions menu.
- Select Delete Contact.
How to permanently delete contacts in bulk
Bulk deletion is done through the Archived Contacts page. Here's the recommended workflow:
- First, archive the contacts you want to delete. You can do this in bulk from the Contacts page by selecting multiple contacts and choosing Archive.
- Go to Archived Contacts (click the dropdown at the top-right corner of the app and select Archived Contacts).
- Select the contacts you want to permanently delete — you can select all or choose individually.
- Click the Delete button in the toolbar.
This two-step process (archive → delete) lets you review contacts before permanently removing them.
Recommended alternatives
Not ready to delete permanently? Here are some safer options:
- Archive instead of delete — Archiving removes contacts from your active list and excludes them from LinkedIn Sync, while keeping them fully recoverable. See the Archived Contacts tab for more.
- Use Views to identify contacts — Create a filtered View to surface the contacts you want to review before deciding to delete. From there, you can archive in bulk, then delete from the Archived Contacts page.
- Export first — Before deleting, consider exporting your contacts via Settings → Import/Export so you have a backup. Large exports are supported, so you can back up your full contact list in one go.
A note on synced contacts
Deleting a contact in Dex does not affect the original source (e.g. Gmail, LinkedIn). However, if you re-run an import or sync, previously deleted contacts may be re-imported. To prevent this, archive the contact instead — archived contacts are excluded from syncs and won't be re-imported.